To change a bike tire you need some materials which are given below:
- Tire levers
- Pump
- New tire
- 15 mm wrench (often needed for older bikes)
Now there are a few reasons why you are changing your bike tire.
- Firstly, the old one might have worn out.
- Secondly, it might have a split in it that will prove dangerous.
- Thirdly, you just want to replace your old with something newer and faster.
Whatever the reason the process remains the same and it starts in exactly the same way you have got to take your wheel.
Front-wheel Bike Tire
Removing the front wheel
For the front wheel, you simply want to release the brakes which in this case, you use the lever and undo quick release and then unscrew it a few turns, and the wheel should just drop out.
If it doesn’t you want to make sure that the tire isn’t catching on the brakes or that you have undone the quick release enough both of these could be potential problems.
Removing the old wheel
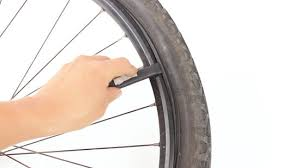
You can unscrew that little lock ring there and then just press on it to let the air out however, you have got what’s called a Schrader valve which you commonly find on car tires. The time deflated we can now actually think about removing it. The first step is to push the bit of the tire it’s next to the rim away from the rim so that’s called the bead and by pushing it into the middle. We are giving it a little bit more space to come off making our job easier. Take a tire lever and insert the hooked end underneath the head of the tire and then simply a case of levering it down. I’m pulling that bead over the edge of the rim.
Now with some tire and rim combinations, it will be loose enough at a specific point that we can just push the tire lever around the rim and lever it off. However, sometimes rim combinations are much tighter than that in which case we will need to get our second and possibly even our third tire lever into play. If it is too tight insert your first one and then use the little hook on the end to loop it around one of your spokes then get your second tire lever put it underneath the tire about two inches or five or six centimeters away and repeat the process and then if need be you might need your third one. With one side of the tire completely off. We can now just pull our inner tube out and the second side of the tire should very easily come off. You would rarely have to use your tilings again to get this second side off. Now before we proceed any further it’s worth taking the time at this point to check the inside of the rim here because this is covered with a layer of tapes and it stops the energy from getting punctured on sharp bits like the holes where the spokes go so just make sure that’s still in really good condition before we proceed any further otherwise you might end up getting punctures.
Installing the new tire
Get a tire out of the packaging and then have a very quick look along the side wall here to see whether the manufacturer has specified which way the tire needs to rotate now on-road tires that are not often the case but if there are any novels then the chances are that you will have to specify the rotation once you sort of that it’s a case of putting one side of the tire back on the rim. We find it helps to do it at our feet and then just guide the tire back on now it’s unlikely again that you’ll need tire levers for this bit. It’s normally loose enough with half the tire.
Now on it’s time to put the inner tube back in you start at the valve hole so you thread the valve into it
and then you want to stuff the inner tube back into the tire and it really helps if you have just got a little bit of air. It actually holds its shape a little bit it’s time to put the other side of the tire back on so again starting at the valve just using your thumbs push the bead of the tire back inside the rim and then work for your hands around it until you get to a point where you can’t actually do it with your thumbs anymore and that’s why we need to have tire levers. At this point, you want to use our tire levers in the exact opposite way to how we have got the tire off so put the hook on the inside and then just leave the tire back on. Now you want to be really careful at this point and make sure don’t get your inner tube caught in the bead of the tire so if that’s happening you need to stop immediately because you might actually puncture the inner tube and it’s just a case of pushing the inner tube further back into the tire. The tire now on before we actually pump it up just want to make completely sure that it is squarely seated and there’s no bits an inner tube poking out so just have a quick look round to make sure you have done your job properly. Now just pump the tire up the manufacturers recommended pressure again that will be written on the sidewall it’s higher once. Now its pumped up simply pop it back in your bike. Reconnect your brakes and you are good to go there.
Rear wheel Bike Tire
Removing the rear wheel
With a rear wheel, it’s slightly more complicated. Firstly, you need to change into your hardest so the smallest cog at the back and that means that the rear wheel will come out much easier as the chain won’t get caught on it. When it’s coming out then you may well have to open the brakes out slightly to allow more room for the tire to pass between the brake pads so to do that you are likely to have a little lever on the side of the caliper just down.
Now you are they give it to twist or you lift it depending on which manufacturers brakes you have got and you will see that there’s just a little bit more clearance between the pads and the wheel so then with your chain in the smallest cog at the back and your brakes open. Open the quick release there’s either unwind it’s off your back wheel there‘ll be enough room now for the wheel to just drop out. Next, hold on to the top tube here, and then with your hand reach down just pull the rear derailleur backward ever so slightly and then lift up with your hands and you will see the back wheel just drops straight out and with your other hand holding the back wheel and just unhook the chain there you go back wheels off.
Replacing the rear wheel:
To replace it simply reverse the procedure. Put your back wheel on the floor and then using your hand that’s on the frame just guide the lower loop chain underneath the sprockets. Then just rest the derailleur on a smaller sprocket and then push the derailleur back again with the hand and the back wheel just drop in now if it doesn’t go in straight away you might just need to give it a little nudge. So just take all of the quick-release maybe just tweak it sideways slightly that’s all it will need now just make sure that the back wheel is in squarely.
You can tell by looking between the brake calipers to make sure there’s the same amount of room on either side but also crucially their little bit of frame down. Whether it seems straight when it is then you close the quick release lever. It should be at the right tension because you haven’t moved it. Remember to double-check, you shouldn’t ever have to force the quick release shut. It should be firm but not too tight. If it is too tight potentially there’s the risk that the quick-release will break but it is unlikely.
Finally, then it just closes your rear brakes up and gives the back wheel to spin just to make sure that it definitely not rubbing there you go a very simple process.